
Written by: Jack Tilbury, Information Systems Masters Student
As university students, we do most of our work online. Our most common resources are the Microsoft Windows packages that come installed on all university computers: Microsoft Word, Microsoft Excel, Microsoft PowerPoint. This article focuses on Microsoft Word and how students can ensure they make the most of the word-processing programme.
If one were to go around campus and ask Rhodes students about the capabilities of Microsoft Word, you would find that students know the bare minimum and that the real potential of what Word can offer is not being realised. This is common amongst both undergraduate and postgraduate students – for a variety of reasons. For example, not all students have had access to technology and university is their first experience of it. At university, we are expected to be computer literate and it is somewhat assumed that everyone should know how to operate the basics of common programmes (Microsoft Word, Excel, PowerPoint). However, for many, it is not that easy, and it can be seen as a big task to get familiar with such programmes. University submissions and papers are not only marked on content but also marked on appearance and layout. Thus, to be disgruntled with academic submissions and consequently mark them down due to poor appearance and layout, based on the preconceived idea that all university students are familiar with technology and computers, is in fact unjust. Furthermore, most high school assignments were hand written – exam pad and pen.
Watch these videos for more formatting tips:
http://postgradenvironments.com/2018/08/24/formatting-thesis-headings/
http://postgradenvironments.com/2018/08/24/formatting-thesis-layouts-breaks/
And this is why I am writing this article – to provide students with some tips on how to enhance their Word submissions through common formatting practices in academia.
As a Master’s student in the department of Information Systems, I have had the pleasure of offering lots of support and advice as a tutor, project support provider, and teaching. I often see Microsoft Word tutorial/practical submissions that lack basic formatting and structure and that do not reflect the full potential of the student.
This article aims to provide a few tips and tricks which can assist students when working on Microsoft Word.
Headings & Sub-headings:
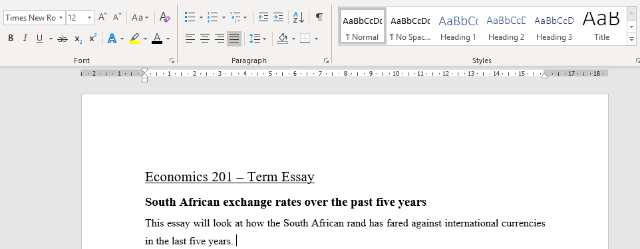
Headings can be used on Word to show hierarchical importance. In most works, there are usually headings or titles of sections and then within that, the work can be broken down and divided into sub-sections. By assigning headings, the writer can illustrate key concepts and supporting themes in an academic paper. Your main headings will often be bigger in text-size than sub-headings and so the size continues to represent order. The main heading is regarded as ‘Heading 1’ and the sub-headings can be regarded as ‘Heading 2’ and so on. Should sub-sections filter down within other sub-sections, you will continue to ‘Heading 3’ and so on.
Below is an example of how headings can be applied. The main heading, which illustrates the title of the project, is highlighted and assigned ‘Heading 1’. The sub-heading, which is the title of the essay, has been assigned ‘Heading 2’. The text that follows, which represent the main content of the assigned is assigned ‘Normal’.
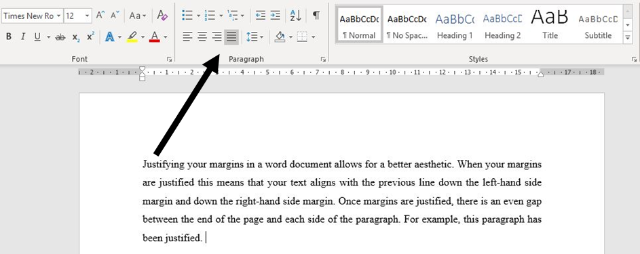
Justifying Margins:
To justify the margins in a Word document means to align the text down the right-hand side and the left-hand side. This allows the text to have an equal area on the right and left-hand side of the page. The benefits of this are that it looks neat and presentable – allowing the reader to have a clear view of the text. Justification of text gives a document a professional look and gives off an instant positive reaction to those who will mark your paper.
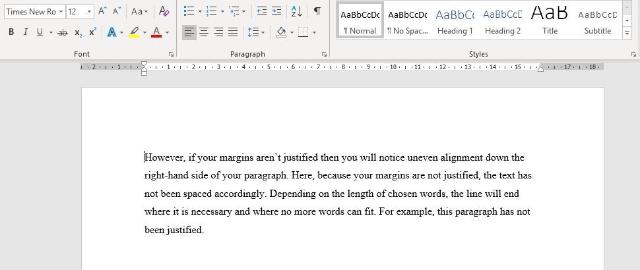
Below are some examples of text being justified and some text aligned to the left. When wanting to justify your text, highlight over the paragraph you want to justify and click the icon seen in the picture below. There might be times when you want text aligned to the right or placed in the centre. These are the other options available to you.
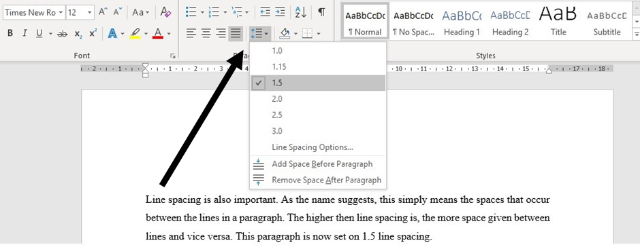
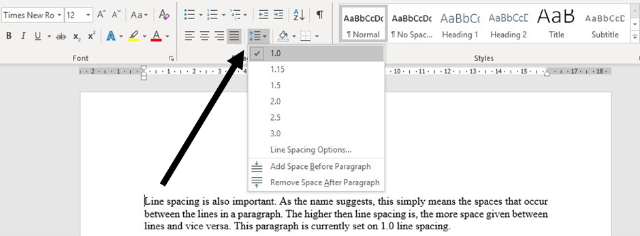
Line Spacing:
Line spacing is exactly what the name suggests – the spaces between lines in a paragraph. Word will give you different options (from small spaces to larger spaces). Assigning no line spacing to your work means that your text will be closely squashed together. This may make it harder for readers and markers as they may lose words in the text. The standard line spacing used in academics at Rhodes University is 1.5 – allowing space between paragraph lines and preventing crowding.
Below are some examples of paragraphs with and without line spacing. When wanting to assign line spacing to your text, highlight over the paragraph and click the icon seen in the picture below.
Grouping of Objects:
Diagrams and visual objects are just as much a part of our academic submissions as paragraphed text. There may be instances when we need to create a diagram to better describe a topic or show the relationship amongst key concepts and their ideas. Additionally, academic works may require illustrating business process flow diagrams. Regardless of the reason or purpose, utilising shapes on word requires attention.
However, placing shapes (and consequent diagrams) in a word document can be confusing – text often gets displayed and objects jump around. Also, we may draw a diagram – involving many shapes – in one part of our document but later decide we want to move it. The practice of dragging and dropping each individual shape in our diagram to a new place in the document can be tedious as well as upset the initial placements we originally chose. This is where grouping of objects occurs.
To group your objects means to connect all objects as one – solidifying your created diagram or model as on joint figure. As a result, you can now freely move the grouped object as one and not move each piece, bit by bit. This helps because it means that once you have aligned your shapes, and structured them accordingly, you will not lose your carefully crafted alignments, should you want to move the shapes.
Below is an example of how to group your diagram(s). In order to group all objects, press and hold CTRL while you select all the shapes in the diagram. Once all shapes/objects are selected, click the ‘Format’ tab beneath the ‘Drawing Tool’s’ heading – seen by the arrow on the left-hand side. Once this is done, click the drop-down icon as shown by the arrow on the right-hand side. From here, a drop-down list will show, and you can select the ‘group’ option. This will group all objects together, forming one big object – which you can move freely.
There are some useful videos available that can take you to the next step: using these layout features to create automatic Tables of Contents and more.
Take a look at these videos for more assistance:
http://postgradenvironments.com/2018/08/24/formatting-thesis-headings/
http://postgradenvironments.com/2018/08/24/formatting-thesis-layouts-breaks/